Archive for category Programming
To upgrade or not to upgrade…that is the question of Windows 10
Posted by Savalia Studios in Programming on August 9, 2015
Microsoft has embarked on what is considered one of the most unique business models, for a limited time they are allowing properly licensed and updated Windows 7/8 users to reserve a FREE copy of Windows 10. Ok, so who doesn’t like free. I know I do, so I reserved a copy for my work computers and my personal computer. For work, one of the machines that I use is a Lenovo T430 laptop. It runs Windows 7 with a Windows 8 upgrade option. While I have only been running Windows 10 for a week or two, it retains the feel of the traditional Windows environment, but helps merge the Metro design that Microsoft to be the next generation of Windows UI[user interface].
I have used Windows 8.1 and Server 2012 (R2) for work. The editions of Windows we use at work are the Professional (to allow domain connectivity). Windows 7 overtook my previous favorite of Windows 2000, when it comes to brute strength and reliability. In the day to day work environment, Windows 7 has been a rock solid performer. Very rarely do we have a system crash due to a OS error. Looking at Windows 8, I was cautious of the tile Metro look, especially since the company I work for uses applications with a traditional interface. Microsoft covers this hurdle smoothly with the Windows 8.1 update. ( To Microsoft, this is an interesting concept, for future OS releases, create the x.1 model that will make the OS conform to accepted business practices, and make the update optional, so the security aspect of the OS is not affected by Windows X or Windows X.1)
Using Windows 10 is good balance of the traditional desktop interface and the Metro interface. For tasks that require searching through the file structure of a system, the traditional interface is convenient and intuitive. When using the start menu, the Metro interface is graphically easier to manipulate, though for a corporate environment, having the gaming, video, a store tiles is unnecessary. Because our business model is not BYOD (bring your own device), the most restrictive access is typically the most productive and efficient. Only allowing users access to the applications to do their daily functions, promotes efficiency while restricting potentials for vulnerabilities.
Medusa Update: Rigged but Not Quite Ready
Posted by Savalia Studios in Programming on April 27, 2013
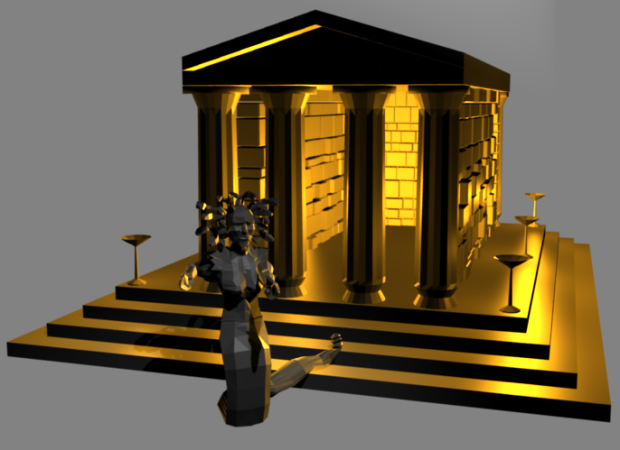
One of the things I have been recently(aside from coding …) working on is related to rigging Medusa (trying to get a decent UV mapping) and getting some Greek architecture in for background (the temple of Nike). Also been using Blender 2.65a, can I just say … Whoooa! Blender rocks!
40+ Fantastic Game Development Tutorials From Across the Web | Gamedevtuts+
Posted by Savalia Studios in Programming, Tutorials, Video Games on January 12, 2013
Michael James Williams wrote an article on 12/20/2012 …
In which he presents a list of 40+ game development tutorials he feels are of interest( and so should you 😉 ). The list covers everything from coding and math to aesthetics and game design. If you haven’t already seen it or come across the mentioned sources, definitely check it out.
40+ Fantastic Game Development Tutorials From Across the Web | Gamedevtuts+.
Pygame Tutorial Update: Tutorial 3.5 Creating Bullets, Enemies, and Meteors
Posted by Savalia Studios in Game Art, Python 2.x, Python 3, Tutorials, Work In Progress on December 12, 2012
Since the update for Tutorial 4 is taking longer than expected, I decided to switch from coding to art assets to keep the posts flowing.
Also, it’s worth noting that on the Gamasutra Web site, Chris Hildenbrand has added more helpful 2D game art tutorials (there are 8 in total, listed at Gamasutra and at Chris’ blog page 2D Game Art for Programmers. If your looking to improve your skills or looking to get up to speed with Inkscape his tutorials are a must read. What caught my attention the most was the tutorials he did on attack helicopters. Helicopters have always been a fun gaming element from back in the days of Choplifter and Infiltrator to Jane’s AH-64D Longbow (and Longbow 2). Chris’ tutorials are very straight forward and easy to follow. In just a couple of hours, you will be able to easily go from a blank Inkscape window to something like:
Pygame Tutorial Update: Tutorial 4 still a WIP
Posted by Savalia Studios in Game Art, Programming, Python 2.x, Python 3, Tutorials, Video Games, Work In Progress on November 26, 2012
At this point we have the basis for the Python pygame model. We have the environment(outer space) and our player with the ability to move, but not shoot (nothing to shoot at yet). The game now looks something like this (using the more “modern” version of artwork):

But, ultimately what the window should look like, to make it more interesting and much more interactive would be something like the following mock up ( currently the game window does not look like this, but this is the intended final result). Currently I’m figuring out the GUI, I’ve gotten the furthest using Tkinter, but I haven’t gotten to the part where I can see the interaction between tkinter’s mainloop() and pygame’s mainloop().

Currently the work being done is on the GUI, to use what is available without having to include any additional install packages, this means that the GUI will be created either directly in pygame or using Tkinter(if possible). An alternate solution I’m thinking of is to create a transparent interface with SVG images and replace the option panel with that and then hardcode the buttons with pygame, but we’ll see how tkinter works out. The actual current window looks like this:

Note about tutorials
Posted by Savalia Studios in Programming, Python 2.x, Python 3, Tutorials on October 10, 2012
Sorry about the source code in the tutorials, (I either lose the spacing but retain the source formatting, or vice versa) while I try and isolate the problem (I have it narrowed down to an ID 10 T error) I have posted complete listings of each of the files;
| Tutorial | Source code |
| Tutorial 01 | Source code listing 01 |
| Tutorial 02 | Source code listing 02 |
| Tutorial 03 | Source code listing 03 |
I checked that the code appears properly in Firefox and IE, if anyone is using a browser other than these drop me a comment if you have difficulty viewing. Help me resolve the ID 10 T error!
Note: You can also leave a comment if you want to vote for either aliens or meteors in the the game.
|
Alien |
Meteor |
 |
 |
Tutorial 03: Full sourcecode
Posted by Savalia Studios in Programming, Tutorials on October 9, 2012
#!/usr/bin/python

# This example runs in Python 2.6 and 3.1 using Pygame 1.9
# This example builds on the stars.py example included in pygame
# Its located at: [python install]\Lib\site-packages\pygame\example

# Imports
import sys
import pygame
import random
from pygame.locals import *

# Constants
WHITE   = 255, 240, 200
BLACK   =   0,   0,   0
RED     = 255,   0,   0
GREEN   =   0, 255,   0
BLUE    =   0,   0, 255
STAR_SIZE = 3
COLORS = [BLACK, # Varies the stars colors
    WHITE,
    RED,
    GREEN,
    BLUE]

WIDTH   = 800 # Use these values to adjust window size
HEIGHT  = 600 # 800 by 600 will give you an idea of how
              # things would look at full-screen.
N_STAR = 100  # Frequency of stars displayed
FPS = 30      # Drawing frame rate
SPEED = 10    # Player speed, larger means faster

class Player(pygame.sprite.Sprite):
    """
    Base object to contain the player.
    """
    def __init__( self ):
        # Initialize Sprite, which is our base class
        # Use pygame.Sprite to create our Player
        pygame.sprite.Sprite.__init__( self )
        # graphic representation of Player
        self.image = pygame.image.load('paint_color01.png')
        # Used for collision detection(with the window)
        self.rect = self.image.get_rect()
        # Starts Player at the bottom-middle
        self.rect.center = (WIDTH/2,HEIGHT)
        self.x_velocity = 0
        self.y_velocity = 0

    def update( self ):
        """ This is the simple "collision detection" for
        the player.  If the player nears the border of his
        intended area of movement, he is kept from leavind
        that area.
        """
        self.rect.move_ip( (self.x_velocity, self.y_velocity) )

        # Horizontal restrictions
        if self.rect.left < 0:
            self.rect.left = 0
        elif self.rect.right > WIDTH:
            self.rect.right = WIDTH

        # Vertical restrictions
        if self.rect.top < 0:
            self.rect.top = 0
        #if self.rect.top < HEIGHT/2:   # Comment out the 2 lines above
        #    self.rect.top = HEIGHT/2   # Un-comment these lines
        elif self.rect.bottom > HEIGHT: # to restrict the player
            self.rect.bottom = HEIGHT   # to the lower-half of window

def initialize_stars():
    """ Creates a list of stars, each star will receive
    a random pair of x and y coordinates for its position.
    """
    star_list = []
    for i in range(N_STAR):
        x = random.randrange(0,WIDTH)
        y = random.randrange(0,HEIGHT)
        star_list.append([x,y])

    return star_list


def draw_stars(surface, star_list):
    """ This function takes a list of stars and
    displays them on the pygame surface.
    """
    for i in range(len(star_list)):
        starColor = random.randrange(0, 4) # For white stars comment out
        color = COLORS[starColor]          # For white stars set to WHITE
        #color = WHITE
        # Set to 0 for no effect
        shimmerEffect = random.randrange(0,STAR_SIZE)
        pygame.draw.circle(surface, color, star_list[i],shimmerEffect)


def move_stars(surface, star_list, color):
    """ This function generates the star movement, if the star has
    fallen below the height of the window, the star is recreated with
    new x and y coordinates, then added back into the list.
    """
    for i in range(len(star_list)):
        pygame.draw.circle(surface, color, star_list[i],STAR_SIZE)
        star_list[i][1] += 1

        # loop the top/bottom of the window
        if star_list[i][1] > HEIGHT:
            # randomize before the star enters the window
            y = random.randrange(-HEIGHT/2, -HEIGHT/16)
            star_list[i][1] = y
            x = random.randrange(0,WIDTH)
            star_list[i][0] = x


def main():
    """ This code creates the Player and assembles the starfield, then
    sends them to pygame.
    """
    clock = pygame.time.Clock()
    random.seed()
    stars = initialize_stars()
    # Entry point to pygame
    pygame.init()
    # Create window
    screen = pygame.display.set_mode([WIDTH,HEIGHT])
    # Create window title
    pygame.display.set_caption('Tut03: Adding the player...')

    # Player setup
    playerSprite = pygame.sprite.RenderClear()
    player = Player()
    playerSprite.add(player)

    # The main game loop
    while 1:
        # the bottom "layer" background
        screen.fill(BLACK)
        clock.tick(FPS)

        # Wait until input is generated
        for entry in pygame.event.get():
            if entry.type == pygame.KEYDOWN:
                if entry.key == pygame.K_LEFT:
                    player.x_velocity = -SPEED
                elif entry.key == pygame.K_RIGHT:
                    player.x_velocity = SPEED
                elif entry.key == pygame.K_UP:
                    player.y_velocity = -SPEED
                elif entry.key == pygame.K_DOWN:
                    player.y_velocity = SPEED

            elif entry.type == pygame.KEYUP:
                if entry.key == pygame.K_LEFT:
                    player.x_velocity = 0
                elif entry.key == pygame.K_RIGHT:
                    player.x_velocity = 0
                elif entry.key == pygame.K_UP:
                    player.y_velocity = 0
                elif entry.key == pygame.K_DOWN:
                    player.y_velocity = 0

            if entry.type == QUIT or \
            (entry.type == KEYUP and entry.key == K_ESCAPE):
                pygame.quit()
                sys.exit()


        # Hide stars prior to move
        draw_stars(screen, stars)
        move_stars(screen, stars,BLACK)
        # Show stars after move
        draw_stars(screen, stars)

        playerSprite.update()
        playerSprite.draw(screen)

        pygame.display.update()
        #pygame.display.flip()


# Stand-alone execution
if __name__ == '__main__':
    main()
Tutorial 02: Full sourcecode
Posted by Savalia Studios in Programming, Tutorials on October 9, 2012
#!/usr/bin/python

# This example runs in Python 2.6(w/wo psyco) and 3.1 using Pygame 1.9
# Using psycho - if installed, it almost cuts CPU usage in half
# This example builds on the stars.py example included in pygame
# Its located at: [python install]\Lib\site-packages\pygame\example

# Imports
import pygame
import random
from pygame.locals import *

# Constants
WHITE   = 255, 240, 200
BLACK   =   0,   0,   0
RED     = 255,   0,   0
GREEN   =   0, 255,   0
BLUE    =   0,   0, 255
STAR_SIZE = 3
COLORS = [BLACK,WHITE,RED,GREEN,BLUE]   # Varies the stars colors
WIDTH   = 600                           # Use these values to adjust window size
HEIGHT  = 600
N_STAR = 100                            # Frequency of stars displayed


def initialize_stars():
    """
    Creates a list of stars, each star will receive a random pair of
    x and y coordinates for its position.
    """
    star_list = []
    for i in range(N_STAR):
        x = random.randrange(0,WIDTH)
        y = random.randrange(0,HEIGHT)
        star_list.append([x,y])

    return star_list


def draw_stars(surface, star_list):
    """
    This function takes a list of stars and displays them on the pygame surface.
    """
    for i in range(len(star_list)):
        starColor = random.randrange(0, 4)              # For white stars comment out
        color = COLORS[starColor]                       # For white stars set to WHITE
        #color = WHITE
        shimmerEffect = random.randrange(0,STAR_SIZE)
        pygame.draw.circle(surface, color, star_list[i],shimmerEffect)


def move_stars(surface, star_list, color):
    """
    This function generates the star movement, if the star has fallen below the
    height of the window, the star is recreated with new x and y coordinates, then
    added back into the list.
    """
    for i in range(len(star_list)):
        pygame.draw.circle(surface, color, star_list[i],STAR_SIZE)
        star_list[i][1] += 1
        # loop the top/bottom of the window
        if star_list[i][1] > HEIGHT:
            y = random.randrange(-HEIGHT/4, -HEIGHT/8)  # randomize before the star enters the window
            star_list[i][1] = y
            x = random.randrange(0,WIDTH)
            star_list[i][0] = x


def main():
    """
    This code assembles the starfield and sends it to pygame
    """
    clock = pygame.time.Clock()
    random.seed()
    stars = initialize_stars()
    pygame.init()                                       # Entry point to pygame
    screen = pygame.display.set_mode([WIDTH,HEIGHT])    # Create window
    pygame.display.set_caption('Tut02: Empty Space...') # Create window title
    screen.fill(BLACK)                                  # Create a "static" background
    while 1:                                            # The main game loop
        draw_stars(screen, stars)                       # Hide stars prior to move
        move_stars(screen, stars,BLACK)
        draw_stars(screen, stars)                       # Show stars after move

        pygame.display.update()
        for entry in pygame.event.get():                # Wait until input is generated
            if entry.type == QUIT or (entry.type == KEYUP and entry.key == K_ESCAPE):
                pygame.quit()
                return

        clock.tick(30)


if __name__ == '__main__':      # Stand-alone execution
    main()
Tutorial 01: Full sourcecode
Posted by Savalia Studios in Programming, Tutorials on October 9, 2012
#!/usr/bin/python
# This example runs in Python 2.6 and 3.1 using Pygame 1.9

import pygame
from pygame.locals import *

def main():
    # Initialize pygame
    pygame.init()
    window = pygame.display.set_mode((300, 300))
    pygame.display.set_caption('Basic Window')

    # Fill background
    background = pygame.Surface(window.get_size())
    background = background.convert()
    background.fill((250, 250, 250))

    # Display some text-using the included font from pygame
    font = pygame.font.Font(None, 36)
    text = font.render('Not very exciting.', 1, (10, 10, 10))
    text2 = font.render('Yet...', 1, (10, 10, 10))
    txtposition = text.get_rect()
    txtposition.centerx = background.get_rect().centerx
    background.blit(text, txtposition)
    txtposition2 = text2.get_rect()
    txtposition2.centerx = background.get_rect().centerx
    txtposition2.centery = background.get_rect().centery
    background.blit(text2, txtposition2)

    # Blit everything to the window
    window.blit(background, (0, 0))
    pygame.display.flip()

    # Event loop - in future examples this will be the game loop.
    while 1:
        for event in pygame.event.get():
            if event.type == QUIT:
                return

        window.blit(background, (0, 0))
        pygame.display.flip()


if __name__ == '__main__':
     main()
Next Tutorial…Python Tutorial 03: Creating Assets
Posted by Savalia Studios in Programming on September 29, 2012
The next Python tutorial will cover creating assets as a continuation of the previous examples. It will show methods of creating the player’s spaceship using Paint.net and Inkscape using two different drawing styles to compare, and then code will be introduced to show the player’s spaceship and how to control it (using the arrow keys) in the game window. Following in the format of the tutorials the code will work equally well with either Python 2.x or Python 3.x.

You must be logged in to post a comment.